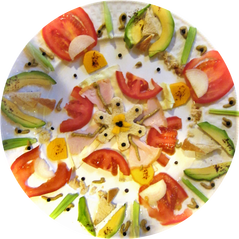
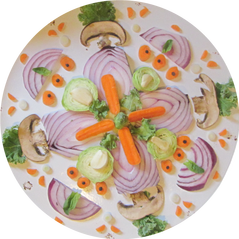
When I was in high school, I took a summer 3D art course at my local community college. One of the projects we did was making mandalas out of food using ingredients to a recipe. I really enjoyed this project and I think it would be a fun lesson to teach students.
Students can create a mandala using ingredients of a recipe, or as an alternative, students can use school supplies, cosmetics, or other non-perishable materials.
Vocabulary: Radial Balance, Symmetry
Photography/Sculpture Homework Assignment: Think about a food you eat. It can be as simple as a peanut butter and jelly sandwich or more complex, like vegetable soup or a rice bowl. Gather the ingredients you use to make your favorite meal and arrange them in a mandala shape. Think about layering the ingredients, using cookie cutters to create interesting shapes, and how to arrange the materials on a plate. When you’re finished, document your creation by taking pictures in a well-lit setting or by a window (natural light is best). Write down the recipe that goes with your creation – it does not have to be complex or precise, just write down the ingredients/materials you used and the food that it can make.
A few weeks ago, I taught a multi-day lesson on GIFs, stop motion, and appropriation to my middle school students.
We began by going over the history of the GIF and its invention in 1987 (everyone was quite shocked how long ago GIFs were invented). Then, we discussed appropriation in art and I had students share their thoughts on whether or not they believed appropriation in art is okay. We looked at Richard Prince’s Cowboy (a cropped, re-photographed version of a cigarette ad) and questioned at what level is art appropriation vs. inspiration vs. plagiarism. I also showed students some of Richard Prince’s artwork from his Instagram series, in which he printed out and scaled up random photos from Instagram, presented them in a show, and then sold them. This also prompted a great conversation on the value of art and whether or not it should be valued as it is.
Then we shifted the conversation from appropriation by famous artists (like Richard Prince), to appropriation in mainstream, pop-culture images produced by the general public (memes, GIFs, etc.). Are memes/GIFs on the internet okay to create if it’s not your own source material? We also discussed fair use images and videos vs. copyrighted ones.
After discussing appropriation, we briefly went over the stop motion process and how it’s used to create animation.
For this assignment, students had the choice of either appropriating images/videos to create a GIF, or to digitally or traditional draw out frame by frame a short, stop motion GIF. Most students used the following GIF makers (below) and either drew out each frame by hand and took photos to input into the GIF maker, or they drew out each frame digitally within Pixilart.
If I were to teach this lesson again, I would make sure to explain how to set up Pixilart and other GIF makers so the aspect ratios/pixels are larger so they don’t come out so pixelated.
Lesson Overview:
Objectives:
Respond to art made with appropriation/stop motion by participating in class discussion
Create a GIF using appropriated or original images/video.
Reflect on GIF by writing an artist statement
Day by Day Breakdown:
Day 1 – Intro to GIFs. Discuss appropriation. Discuss stop motion. Intro to assignment, brainstorm ideas.
Day 2 – Continue brainstorming ideas for GIFs. Demo how to use GIF makers. Look at examples of GIFs on the internet.
Day 3 – Draw out storyboard/plan for GIF. Begin assembling materials to create GIF.
Day 4/5 – Finish creating GIF. Write artist statement.